
Before starting your engine, taking ten minutes to inspect your motorcycle can mean the difference between an exhilarating ride and a dangerous mechanical breakdown. While car drivers can often pull over safely with a flat tire or worn brake pad, a mechanical failure on two wheels presents immediate control hazards.
Developed by the Motorcycle Safety Foundation, the T-CLOCS pre-ride inspection checklist is the industry standard for systematic motorcycle safety checks. T-CLOCS stands for Tires, Controls, Lights, Oil/Fluids, Chassis, and Side Stand. Incorporating this quick routine into your pre-ride habit ensures your machine remains dependable and road-ready every time you mount up.
T – Tires and Wheels
Your tires are the only contact point between your motorcycle and the asphalt. Given that each tire’s contact patch is roughly the size of a credit card, maintaining optimal rubber condition is critical.
- Tire Pressure: Check cold tire inflation using a calibrated pressure gauge. Under-inflated tires cause sluggish handling, uneven wear, and rim damage, while over-inflated tires reduce your contact patch and harsh ride quality.
- Tread Depth: Inspect tread grooves for wear indicators. Replace tires before reaching legal minimum limits, or when tread depth falls below 2/32 of an inch.
- Rubber Condition: Examine tires for cracks, dry rot, embedded nails, or sidewall bulges.
- Wheels & Spokes: Inspect alloy wheels for dents or cracks. On spoked wheels, tap each spoke with a small wrench—a dull thud indicates a loose spoke that needs tensioning.
C – Controls
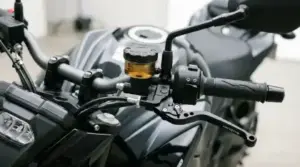
Smooth inputs depend entirely on properly adjusted levers, cables, and pedals. Binding or worn controls compromise emergency reaction times.
- Levers & Pedals: Ensure front brake and clutch levers move smoothly without binding. Verify that the rear brake pedal and gear shift lever are securely mounted and positioned correctly for your boots.
- Cables: Inspect control cables for fraying, kinked housing, or stiffness. Keep inner cables lubricated to prevent sudden snapping.
- Hoses: Check hydraulic brake and clutch lines for cracks, hardening, leaks, or secure routing away from pinch points.
- Throttle: Rotate the throttle grip and release it. The grip must snap back smoothly to the fully closed position in all handlebar positions.
L – Lights and Electrics
Being seen by motorists is vital for street survival. Electrical failures leave you vulnerable during low-light conditions and heavy traffic.
| Electrical Component | What to Inspect | Action Required |
|---|---|---|
| Headlight | Low and high beam functionality; clean lens. | Replace dead bulbs immediately; adjust beam angle if blinding oncoming traffic. |
| Brake Lamp | Activation from both front lever and rear pedal. | Adjust rear brake light switch sensitivity if the lamp fails to illuminate promptly. |
| Turn Signals | Front and rear flashers left/right. | Clean contacts or replace bulbs if signal stays solid or blinks rapidly. |
| Mirrors & Horn | Clear view, tight mounting stems, loud horn blast. | Adjust mirrors while seated in riding position; tighten loose mounting nuts. |
O – Oil and Fluids
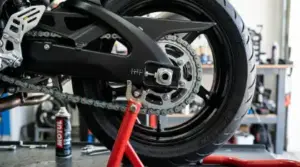
Fluid leaks not only damage internal engine components, but they can also drip onto your rear tire, causing a catastrophic loss of traction.
- Engine Oil: Check oil level via the sight glass or dipstick while holding the bike level on flat ground. Top off with manufacturer-recommended oil weight if low.
- Brake & Clutch Fluid: Inspect fluid reservoirs. Dark, dirty, or amber fluid indicates moisture contamination requiring a fluid flush.
- Coolant: On liquid-cooled motorcycles, verify coolant level in the overflow reservoir when the engine is cold.
- Fuel System: Inspect fuel lines for cracking or weeping joints. Never ride with a leaking fuel connection.
C – Chassis
The chassis ties your suspension, frame, and drive systems together. Structural play or improper alignment affects cornering stability.
- Frame & Front Forks: Inspect frame welds for cracks or flaking paint (a sign of stress). Check front fork stanchions for oil film caused by blown fork seals.
- Drive Chain or Belt: Check chain tension according to owner manual specifications (typically 1.0 to 1.5 inches of slack). Verify that the chain is clean, lubricated, and free of tight links. For official reference on maintenance procedures, consult the Motorcycle Safety Foundation official guidelines.
- Fasteners: Scan major structural bolts—axle nuts, motor mounts, brake caliper bolts, and handlebar clamps—to ensure everything is torqued securely.
S – Side Stand and Center Stand
A failing kickstand mechanism can cause severe crashes if it deploys while cornering or fails to cut engine power when selected in gear.
- Return Spring: Verify that the side stand spring pulls the stand up firmly against the frame without drooping.
- Cut-Off Switch: Test the safety cut-off switch. With the side stand down, shifting into 1st gear should instantly stall the engine.
- Center Stand: If equipped, ensure the center stand pivots freely and locks out of the way of the drive chain and ground clearance envelope.
Final Thoughts
Running through the T-CLOCS checklist takes less than ten minutes once you become familiar with your bike’s layout. Making this pre-ride check a permanent habit protects your investment, prevents unexpected road side breakdowns, and helps ensure you return home safely after every ride.