
Enrolling in the Motorcycle Safety Foundation (MSF) Basic RiderCourse is the single best decision you can make when starting your motorcycling journey. For most beginners, it is the safest pathway to earning a motorcycle license endorsement while learning critical control skills. However, step onto the training range unprepared, and basic clutch control or tight slow-speed turns can quickly become overwhelming.
Passing your MSF course on the very first try requires more than just showing up. It demands the right protective gear, mental focus, and an understanding of key low-speed riding maneuvers. This ultimate checklist covers everything you need to prepare, perform, and pass with confidence.
Phase 1: Pre-Course Preparation & Mandatory Gear
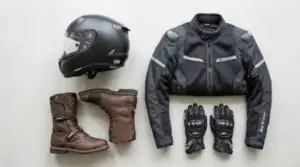
Before you ever mount a training motorcycle, your instructor (RiderCoach) will inspect your riding gear. Arriving without mandatory personal protective equipment (PPE) will result in immediate disqualification before the engine even starts.
- Full-Face or 3/4 Helmet: Must be DOT-compliant at minimum, though choosing an ECE 22.06 certified helmet provides significantly superior impact and rotational safety.
- Eye Protection: If your helmet does not feature an integrated face shield, bring shatterproof safety glasses or riding goggles.
- Full-Finger Gloves: Choose sturdy leather or high-denier textile gloves that cover your entire hand without excess material at the fingertips.
- Long Sleeve Shirt or Jacket: Wear a durable long-sleeved shirt or an armored motorcycle jacket to satisfy range requirements and protect against abrasion.
- Sturdy Over-the-Ankle Footwear: Work boots or dedicated riding boots that completely cover your ankle bones with non-slip rubber soles. Canvas shoes or low-cut sneakers are strictly forbidden.
- Durable Full-Length Pants: Heavy denim jeans or textile riding pants without rips, tears, or flare cuts.
Phase 2: Classroom & E-Course Foundations
Most MSF basic courses require completing an online e-Course or in-person classroom module prior to range practice. This theoretical component covers traffic strategies, risk management, and the physics of motorcycle control.
Pay close attention to the SEE strategy (Search, Evaluate, Execute):
- Search: Scan 12 seconds ahead for surface hazards, turning vehicles, and escape paths.
- Evaluate: Anticipate potential conflicts and predict how road conditions or drivers might react.
- Execute: Action your defense early by adjusting speed, shifting lane position, or signaling intent.
Phase 3: Mastering Low-Speed Control Drills
The physical range portion of the course focuses heavily on low-speed balance. Because motorcycles behave differently at low speeds, mastering three fundamental techniques will ensure you pass your motorcycle MSF course evaluation drills effortlessly.
1. Friction Zone Control
The friction zone is the area of clutch lever travel where power begins transmitting to the rear wheel. Beginners often drop the bike or stall by releasing the clutch too quickly.
Pro Tip: Keep your left wrist straight and ease the clutch lever out millimeter by millimeter. If the motorcycle feels like it wants to stall, squeeze the clutch lever back in slightly rather than stomping on the ground.
2. Head and Eye Placement
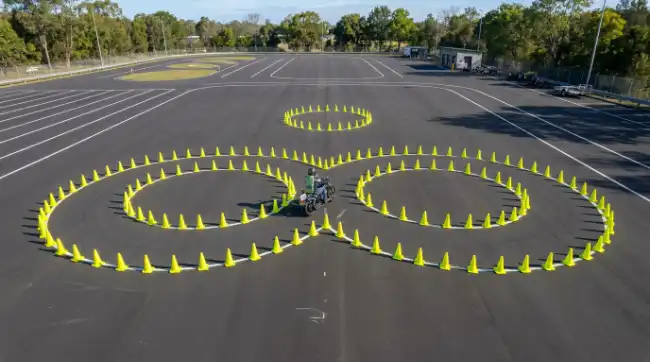
A cardinal rule of motorcycling is that your bike goes wherever your eyes look. During tight U-turns, figure-8 weaves, and cornering exercises, looking down at your front wheel or directly at the orange cones will cause you to lose balance instantly. Turn your head completely toward your intended target path before initiating a turn.
3. Low-Speed Rear Braking
While the front brake provides up to 70% of stopping power during straight-line emergency braking, grabbing the front brake lever while turning at 5 mph will snap the front wheel inward and drop the motorcycle. Use light rear brake pressure during slow-speed maneuvers to stabilize the chassis.
Phase 4: Evaluation Day Range Exercises
The practical exam at the end of the course tests four core maneuvers. Here is how to execute each exercise without penalizing points:
| Evaluation Drill | Common Pitfall | Winning Technique |
|---|---|---|
| U-Turn Box / Figure 8 | Putting a foot down or crossing boundary lines. | Turn your head completely, feather the friction zone, and drag the rear brake. |
| Obstacle Swerve | Braking during the turn or hitting cones. | Separate braking from steering; push the handlebar firmly in the direction of the turn. |
| Quick Stop | Grabbing the front brake violently or skidding. | Apply smooth, progressive front brake pressure while stepping on the rear brake. |
| Cornering Judgment | Entering too fast and running wide out of the path. | Slow down before entry, look through the exit, and roll on gentle throttle. |
Phase 5: Mental Preparation & On-Range Conduct
Physical preparation is only half the battle. Your mindset during the 2-day training course plays a major role in your success.
- Listen to Your RiderCoach: Instructors are there to help you succeed, not to fail you. Follow their exact instructions, ask questions when uncertain, and adjust your technique when given feedback.
- Stay Hydrated and Rested: Range days involve hours of standing under direct sunlight. Bring plenty of water, high-protein snacks, and get a solid night of sleep before both days.
- Reset After Mistakes: Putting a foot down during practice or stalling the engine happens to everyone. Do not let one minor mistake snowball into frustration during evaluation drills. Shake it off and focus on the next rep.
Final Thoughts
When you prepare your gear in advance, respect the low-speed fundamentals, and keep your vision focused where you want to go, you set yourself up to pass your motorcycle MSF course on the very first try. The skills taught on the training range form the foundation of a lifetime of safe, enjoyable riding.